
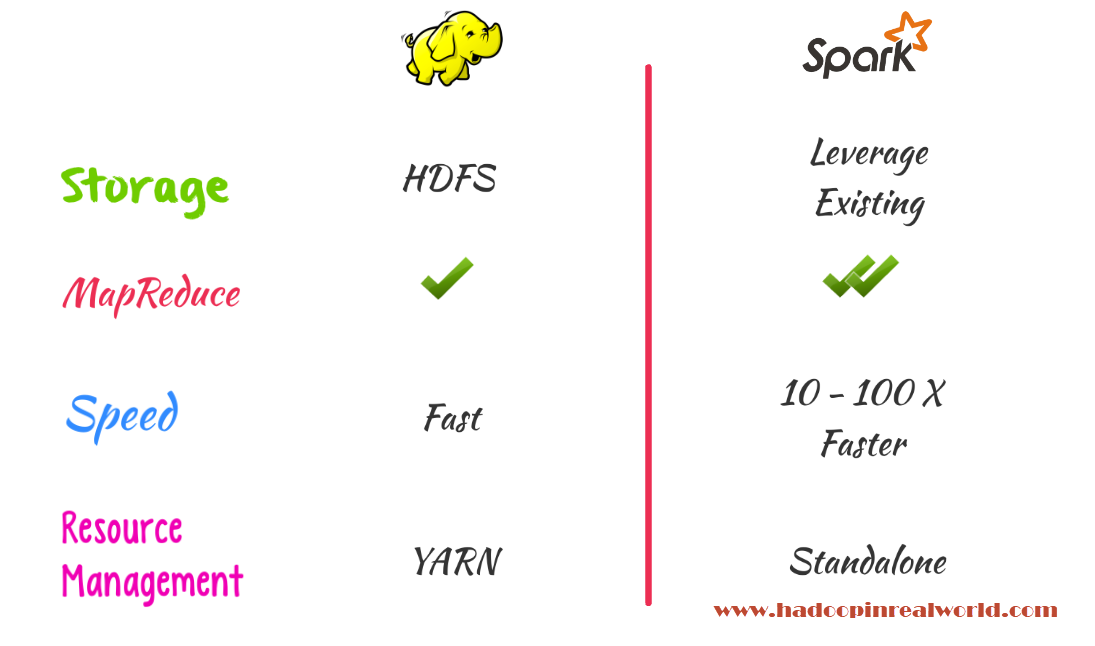
Spark vs. Hadoop – Who Wins?
September 13, 2017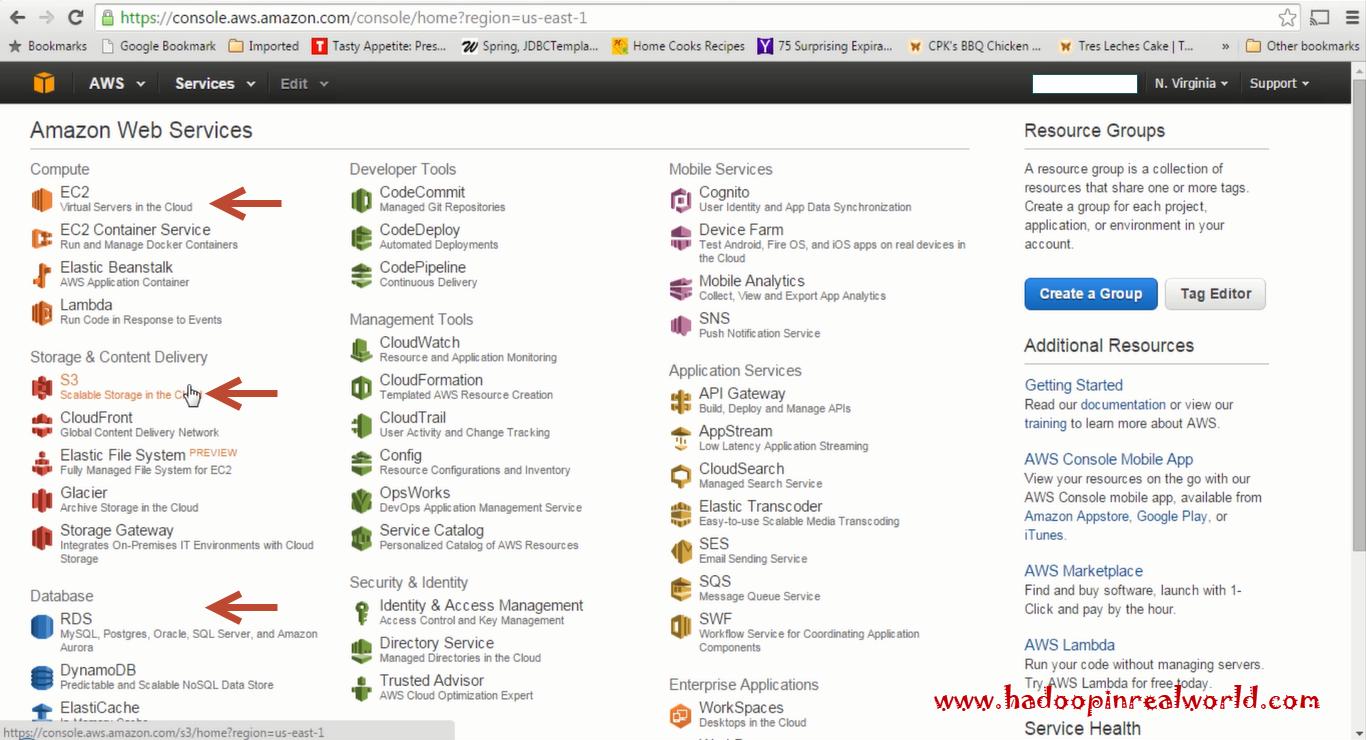
Creating EC2 Instances in AWS to Launch a Hadoop Cluster
September 27, 2017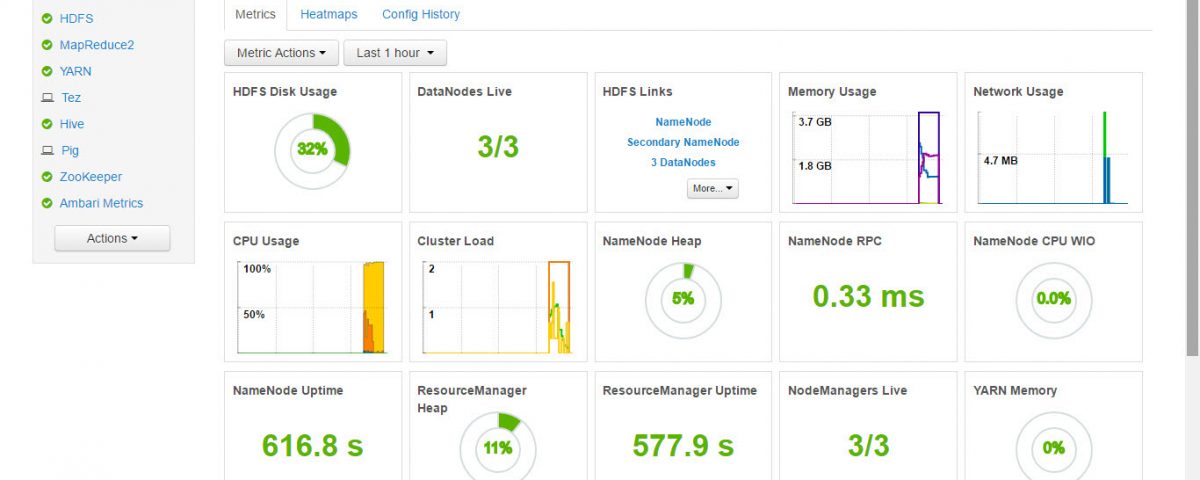
Apache Ambari is an open source project and its main purpose is to install or deploy, manage and monitor Hadoop clusters. In this post we will see what is the Apache Ambari and how it is different from Cloudera Manager, we will also see the high level architecture of Ambari and we will we provision or in simple terms deploy or install a Hadoop cluster.
Cloudera Manager is a cluster management software for Cloudera Distribution. So why do we need another cluster management software when we already have cloudera manager? Cloudera Manager is a proprietary software from Cloudera and it is used to manage Hadoop cluster for Cloudera Distribution including Apache Hadoop or in short CDH clusters. Apache Ambari is an open source project and Hortonworks which is another major Hadoop vendor has adopted Apache Ambari as the tool of choice to provision, manage and monitor clusters for it’s Hadoop distribution, Hortonworks Data Platform, HDP for short.
If you like to explore more about Apache Ambari and other Hadoop administration concepts, check out our Hadoop Administrator In Real World course.
One of the common question we get from students and our community is that – can we use cloudera manager to manager a HDP cluster or can we use Ambari to manage a CDH cluster? Both are not possible. Even though both CDH and HDP are derived from the same Hadoop open source project. Cloudera and hortonworks have done several changes to their libraries and both cloudera manager and ambari are designed to work with it’s respective platforms. So for this reason we can’t use ambari to manage a CDH cluster and also we can’t use cloudera manager to manage a HDP cluster.
Prepare for installation
Let’s look at the prerequisites and the nodes setups before we look at the installation and configuration of Hadoop cluster. Before all that, lets look at Ambari’s architechture.
Architecture
The architecture of Ambari is very much similar to the architecture of Cloudera Manager. We will have Ambari server installed usually on it’s own dedicated node and then ambari agents running on every single node in our Hadoop cluster. Ambari server will then communicate or push commands to ambari agent also the ambari agents will send out heart beats to Ambari server. This way Ambari server will have a good view of the cluster and will also be able to control the services on each node.

Prerequisites
Let’s look at the prerequisites to run Ambari. Here are the supported operating systems. We have been using Ubuntu so far in our course, so we will continue to use Ubuntu and we will go with the latest supported version ubuntu trusty 14.04. Next, let’s look at the software requirements. All softwares listed are pretty straightforward so we don’t have to worry too much. Next important requirement is the JDK. Ambari supports JDK 1.7 and 1.8. We will go with JDK 1.8. We need to make sure the release we try to install is over 1.8_40.

EC2 Instances
Here is our game plan. We will launch 4 ec2 ubuntu instances in AWS. In one of the instances we will run Ambari Server and the other 3 nodes or instances will be our Hadoop cluster. If you are new to AWS, follow this post on creating instances on EC2 and how to prepare them for a Hadoop installation.
We are now ready to install ambari-server on node 1. To install ambari-server we will run the command apt-get install ambari-server. Now that ambari-server is installed we need to run ambari-server setup to perform couple of setups that is needed to run ambari properly.

So let’s execute. ambari-server setup. The very first thing the setup will do is to download and install Java Cryptography Extension (JCE) Policy Files; this is needed when we decide to configure components like kerberos in our cluster. Here we will select JDK 8 because we have installed JDK 8 in our environment. We need to accept the license next, let’s enter yes.

For Ambari to work properly, it needs to store the information like configuration of the cluster, information about the nodes in the cluster etc. in a reliable database. Ambari by default store such information in a PostgreSQL database. We are not going to perform any advanced configuration, we are going to stick with the defaults. So we say no to this prompt.
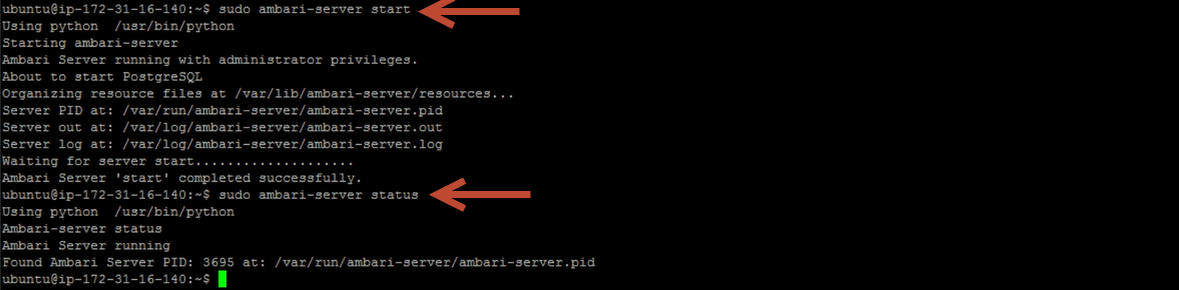
Setup is now complete. Now we are ready to start Ambari. Let’s run ambari-server start. Ambari is now started. We can check the status of Ambari by running ambari-server status command
Install & configure Hadoop cluster with Ambari
We can get to Ambari user interface on port 8080 on the node where it is installed. By default the username and password is admin and admin. Don’t forget to change the password later to something strong. Here is the ambari home page.

We have 3 main options on the home screen, to deploy a cluster, which is what we will do next, to manage users and groups and deploy views. Think of views as a pluggable UI component. Let’s say for eg. as an administrator you would like to get a better visualization of the jobs running in your cluster, of course you can use the Resource Manager’s web user interface. But it only give you a big list of jobs and you don’t like the fact that it doesn’t provide a good summary of the current state of the jobs in your cluster. In that case, you can create a small web application using Hadoop API and create a visual representation of the running currently running and the ones that failed and succeeded. You can customize the view as per your need. You need to code the application of course to create a view from scratch. But Ambari already comes with few views to help us perform day to day admin tasks. You will most likely don’t see a need to create views but if you do have a need to customize something it is good to know that Ambari offers a way for you to do so.
Alright. Let’s click “launch install wizard” to set up our Hadoop cluster. We are going to set up a 3 node Hadoop cluster with all key services like HDFS, YARN, Pig, Hive etc.
Hosts
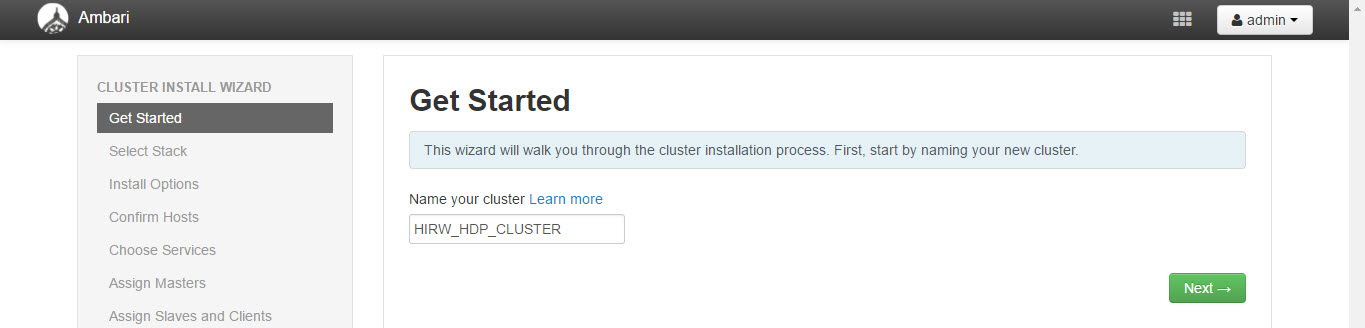
We need to provide a name to the cluster. I am going to name it HIRW_CLUSTER. Next we need to select the version of Hortonworks Data Platform, we are going to select HDP 2.2.

Next, we need to provide the list of nodes that will be part of our Hadoop cluster. We are going to give the private DNS of the EC2 instances that we launched in AWS here. Ambari server needs the private key to login to these nodes. So we will select the .pem file which will serve as the key to login to these nodes, we should also enter the username that corresponds to the key. The username associated with key is ubuntu so we enter that on this screen. Click Register and Confirm, if the hosts are reachable and key is good all our 3 hosts will be confirmed and this would mean Ambari can reach the nodes and able to login as well.
Select and configure services
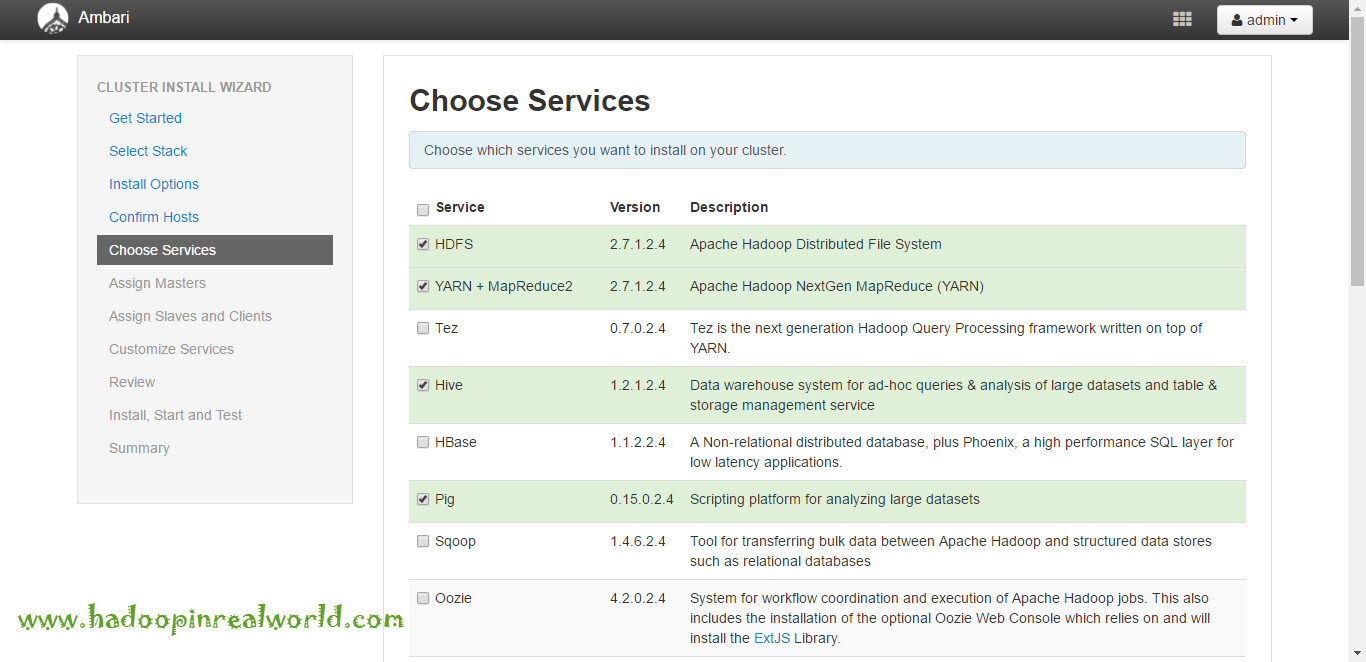
Next screen let’s us to select the services we need to install in our cluster, we will select HDFS, YARN, pig and Hive. we are not planning to install other services like HBASE, Oozie at this time.
Based on our selections Ambari will list other dependant services that is needed to be included in our cluster. In the next screen, we need to select the nodes where core services like namenode, resourcemanager, secondary namenode, zookeeper etc. will run. We are going to make namenode and resourcemanager run on the same node, typically in a production cluster, namenode and resourcemanager will run on separate dedicated nodes. Zookeeper will run on all 3 nodes. Secondary namenode will run on node 2. Along with services for Hive.

In the next screen, we will designate where data nodes and node managers will run. We will run data nodes and node managers on all nodes, we will also install clients on all nodes. This would mean we can run HDFS, YARN, pig and Hive commands from any nodes since we have installed clients on all nodes. NFSGateway allows HDFS to be mounted as a drive so you can browse HDFS as if you are browsing a local file system. We will install this on all nodes as well.

Click next, in the next screen we will have the option to change any configuration values. We will go ahead with the default configuration properties. We see 2 errors which we need to take care of one in Hive and the other one in Ambari metrics. We need to give the password for the hive database so we can login to the database if needed. On the Ambari metrics page we need to provide password for Grafana. Grafana is an opensource tool to build beautiful and powerful dashboards, it is great to plot time series data which mean it is great to visualize our cluster for monitoring purposes. It is a basically a charting application. Ambari includes Grafana. This password we are inputting here is for Grafana’s dashboard which can be used to build charts as needed. So give a password for both Hive and Amabari Metrics page.

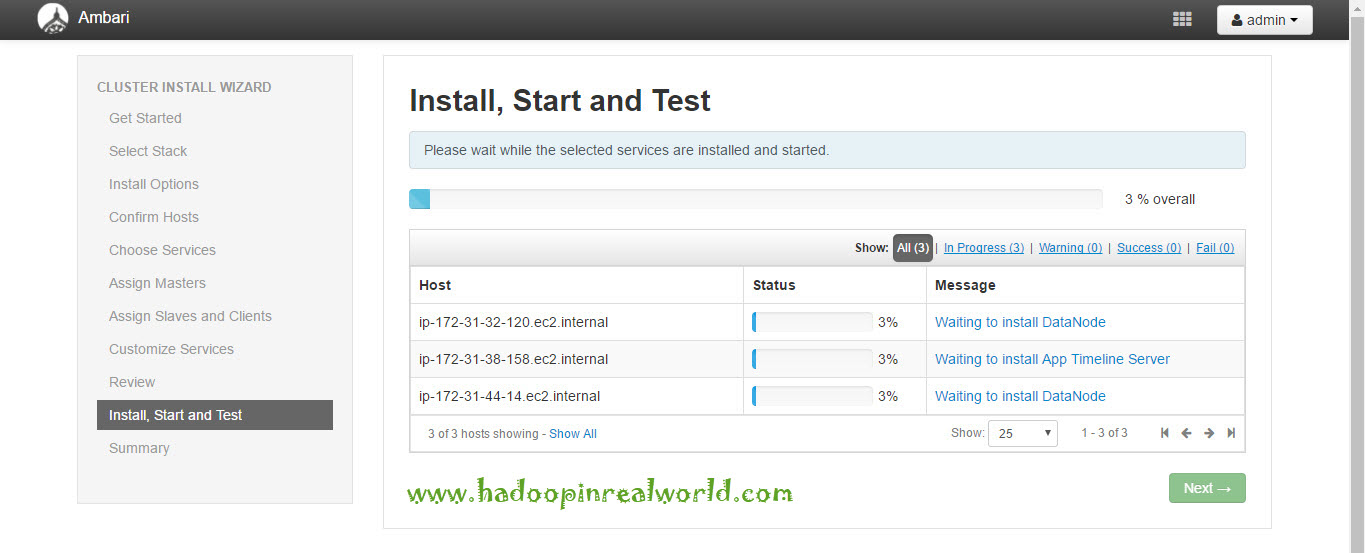
We are almost done here, In the next screen we will review all our selections we have made so far. Everything looks good here, let’s click deploy. We can just sit back and monitor the progress of installation, Ambari will take care of installing all the services which we have selected and it will happen parallely across all nodes. So let’s wait for the installation to complete.

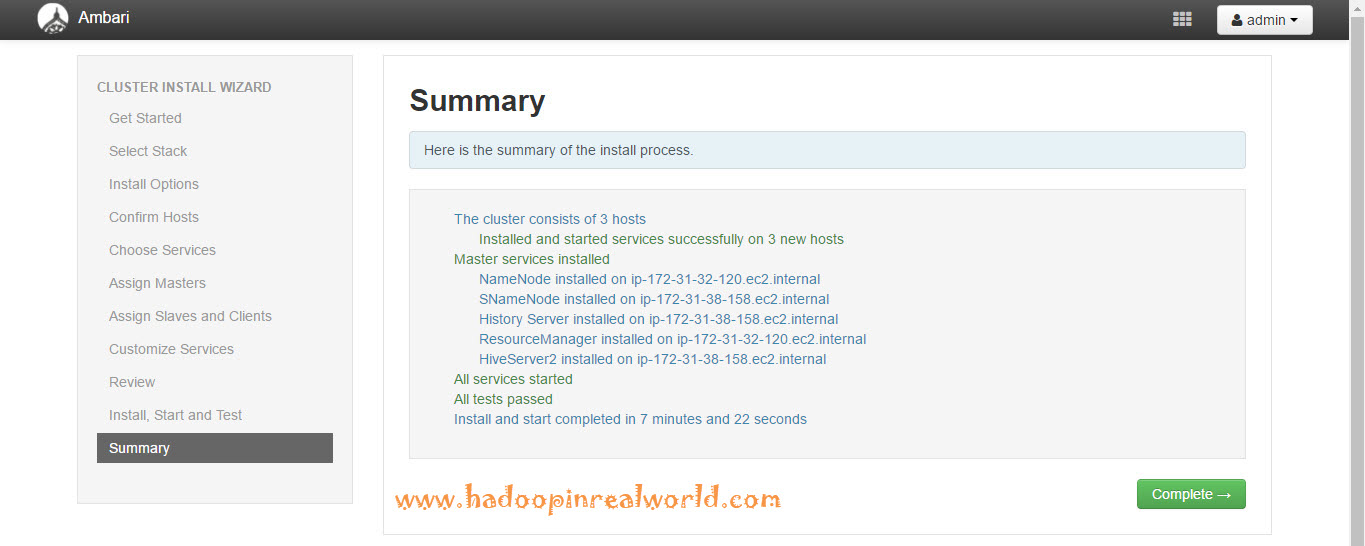
There you go. Installation is now complete. And it is successful. Let’s click next to see the summary and finally hit complete. Here is the cluster home page now with good looking charts. Everything is green which confirms our cluster is in good shape.

Summary
It is a good idea to upload or create file and run a MapReduce job to prove out that the installation is indeed successful. So in this post we looked at what Apache Ambari is, it’s architecture and how it is different from Cloudera Manager and we deployed a brand new Hortonworks Data Platform Hadoop cluster in matter of minutes.
Would you like to explore more of Apache Ambari? Check out our Hadoop Administrator In Real World course.