
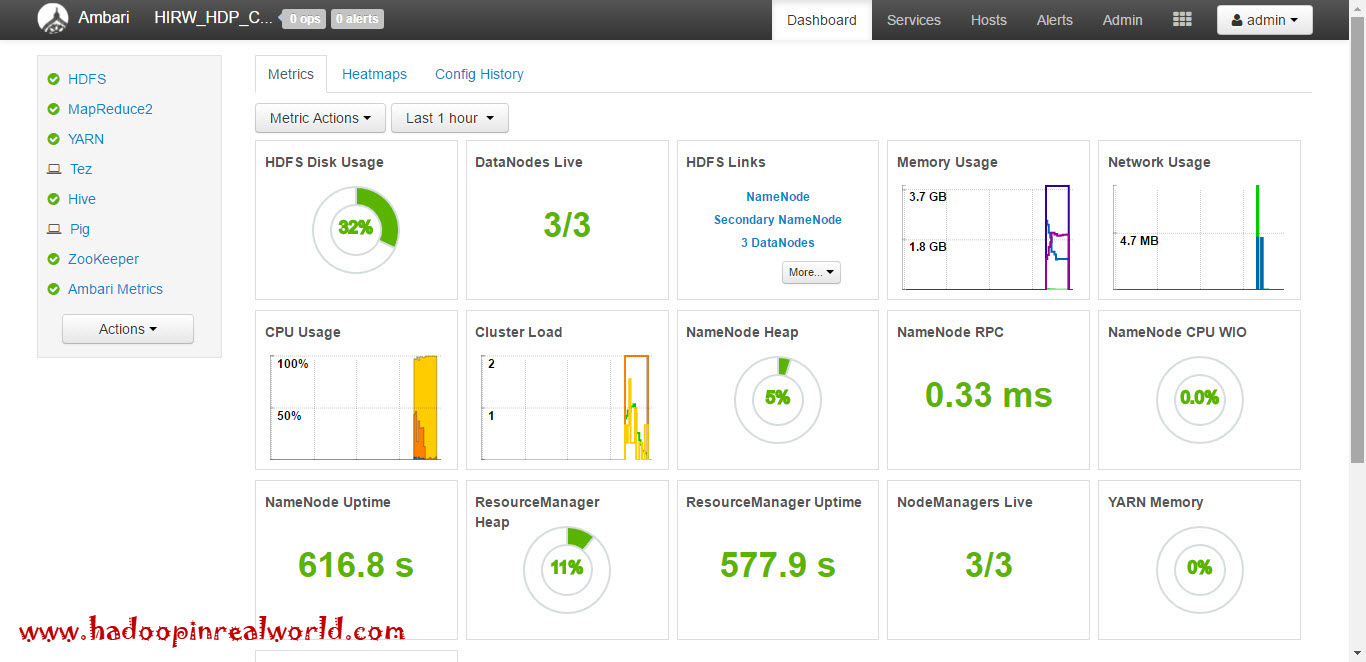
Installing and Configuring a Hadoop Cluster with Apache Ambari
September 20, 2017RCFile vs. ORC
October 4, 2017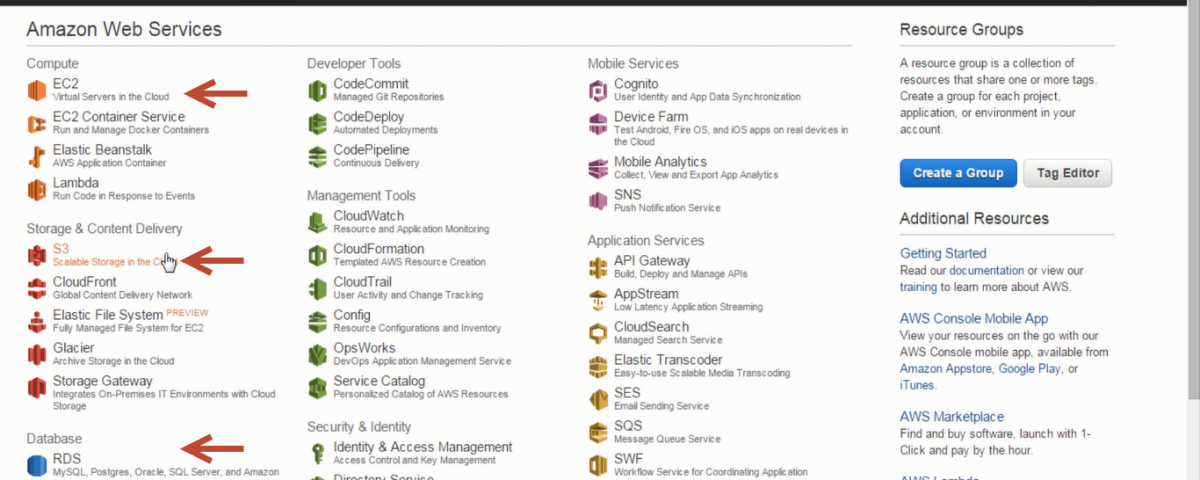
This is one of the most widely requested post from our community. We have seen over and over again in other courses where they would start with setting up the cluster right away without providing enough knowledge about Hadoop architecture. As a result of this, we see students struggle since they don’t fully understand the architecture and finally lose interest in the technology and drop it altogether. It is like teaching a student to build a guitar first who is actually interested in playing a guitar.
That is why we took a different approach in our Hadoop Developer In Real World course. We covered all the essentials and core concepts first before diving in to cluster setup. We also made sure the learning experience as easy as possible for our students and to facilitate that we created a cluster and provided access to the cluster to all our students so they can use it for learning.
Introduction to AWS & Prerequisites
Use this is post as a reference to set up EC2 instances on AWS cloud. Once you have the instances, follow Installing and Configuring a Hadoop Cluster with Apache Ambari to set up a Hadoop cluster.
What is AWS?
Amazon Web Services, AWS for short is a collection of remote computing services that make up a cloud computing platform which is offered by Amazon. AWS offers a wide variety of software services to choose from. let’s say you want to stand up linux or window instances you can do so in a matter of minutes using Elastic Cloud Compute or EC2 for short. If you would like to store large volume of data on the cluster you can choose to use Simple Storage Service or S3 for short. Let’s say you want to start a database like MySQL or Oracle you can do so in a matter of minutes with AWS under Relational Database Service or RDS for short. If you would like to execute a MapReduce job that can span to multiple computers based on the size of your data, you can launch a MapReduce job using Elastic MapReduce or EMR for short.

With AWS or any cloud computing platform you don’t have to own private servers anymore. Launching 100s of instances is at your fingertips and most importantly you can do so in minutes. AWS is not the only cloud platform and there are many other players in the market like Microsoft Azure, Google Cloud, Rackspace etc. But AWS is a pioneer in this area and lot of successful websites like netflix, reddit, yelp etc. are powered by AWS.
Installation Type & High Level Architechture
There are few different ways to install a Hadoop cluster. We can use Cloudera Manager or Ambari which will pretty much automate the deployment. Cloudera Manager or Ambari has a good web interface which will pretty much walk you through the deployment. Both tools offers more of an auto pilot deployment even the configuration of the cluster can be done through these tools. We can also do a manual deployment in which we download individual modules like namenode, datanode etc. from cloudera and install and configure one by one. Once you have the hosts up and running, go to Installing and Configuring a Hadoop Cluster with Apache Ambari to set up a Hadoop cluster.
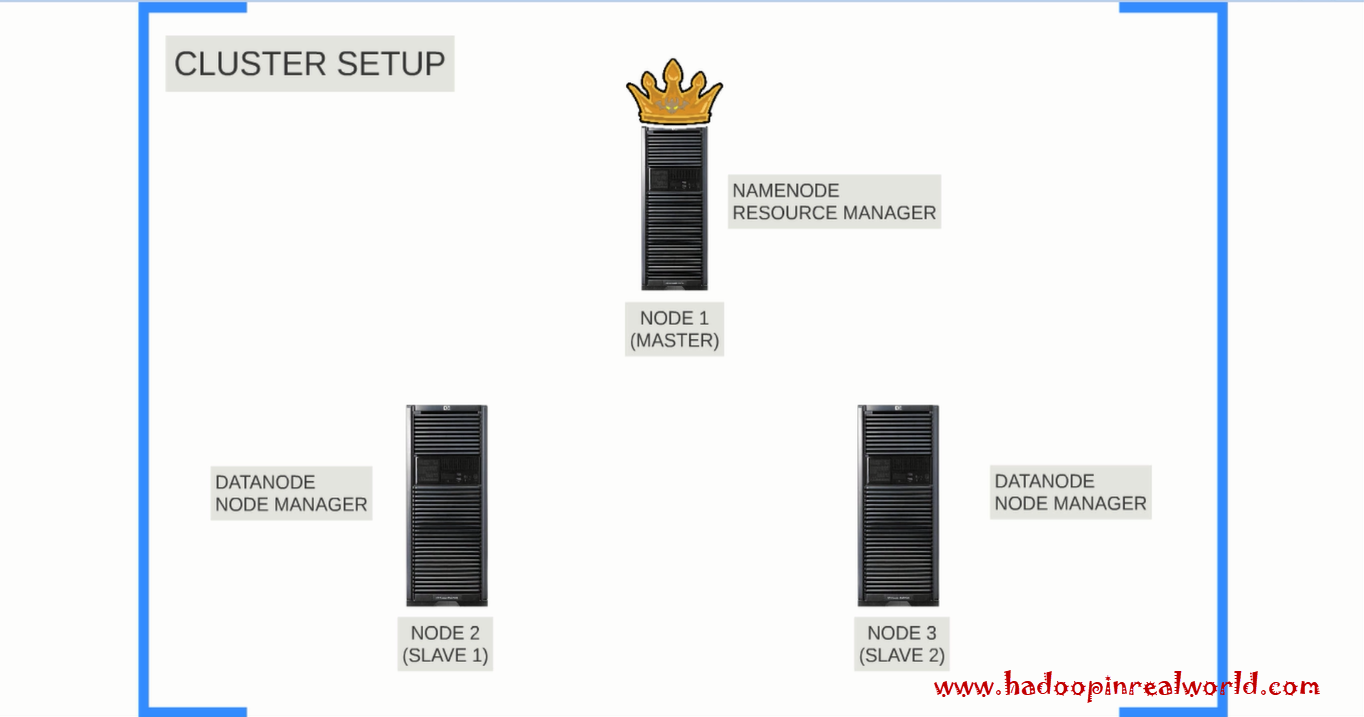
We are going to stand up 3 linux instances or hosts or servers and we are going to install Cloudera CDH (short for Cloudera Distribution Including Apache Hadoop) version 5.4 on them. Here is how the high level architechture looks like. Ideally we would like to install Namenode and Resourcemanager on different nodes. But in the interest of time and keeping things simple we are going to install both namenode and resourcemanager on the same node. Then we will install datanodes and node managers on the other 2 nodes. finally we will install secondary namenode on node 2. We will refer to node 1 as the master node and node 2 and node 3 as Slave 1 and Slave 2 in this post. The very first thing we would need is 3 Linux instances. So now we want to decide on what flavour of linux we would like to use, what version of java to install etc.
Requirements
Let’s look at the CDH5 requirements and supported versions page on Cloudera’s website. Cloudera clearly list all the OS requirements. As you can see you can install and run CDH5 on Redhat, Centos, Ubuntu etc. We are going to use Ubuntu latest version 14.04 which is code named Trusty. Next let’s look at the supported JDK version. Cloudera supports JDK 1.8 and again we will use the latest JDK 1.8 release.
Setting up 3 instances in AWS
Now let’s see how we can start 3 ubuntu linux instances on AWS. First you need an account with AWS. Creating an account is free although keep your credit card handy because you need a valid credit card to register but you will only be charge for your usage. With new accounts you will also get to run one free tier instance free for 12 months. Which sounds great and it is, but the problem is, free tier instance comes only with little less than 1 GB of main memory. Which is pretty low and not ideal to run Hadoop on it and that is a limitation. With AWS you pay by the hour for your usage.
Once you create an account with AWS, login using the account. I am already logged in to the AWS console. since we need to start linux instances we have to go into the EC2 service which stands for Elastic Cloud Compute. You can see we already have 3 instances running. Lets click on Launch instances. Here the very first selection that we would have to do is to select the Operating System. We know we are going to use Ubuntu 14.04, so let’s select that.

Instance Type
The next selection is very important. Here we have to choose the instance type. This is a very important choice because based on what you select here you will incur charges accordingly. The very first option is the free tier and it offer 1 GB of main memory which is very low. It says here Free Tier eligible. It does not mean that you can run many Free Tier instances for free. It says very clearly here – “For the first 12 months following your AWS sign-up date, you get up to 750 hours of micro instances each month. When your free usage tier expires or if your usage exceeds the free tier restrictions, you pay standard, pay-as-you-go service rates”. If you do the math 750 hours is roughly running one instance 24/7 for a month.

To check out the pricing visit AWS EC2 pricing sheet. Amazon is good about bringing down the prices from time to time. Here you will see all instances are priced by the hour. The instance we are going to choose for the demo is T2.MEDIUM and it offers 2 virtual processors and 4 GB of RAM which is ideal for us and it cost $0.047 per hour at the time of writing this post.
https://aws.amazon.com/ec2/pricing/on-demand/
Now let’s go back and select T2.Medium. Click on next. We need 3 instances so let’s enter 3. Rest of the option we don’t have to change.

Storage & Security
Click on next to configure storage. Since this is a demo cluster I am going to leave it as 8 GB. But if you are planning to do some serious analysis with big dataset choose the amount of storage accordingly. Now again storage costs money. You can look at the pricing for storage as well in the pricing sheet @ https://aws.amazon.com/ebs/pricing. Storage in AWS is powered by a service called Elastic Block Store or EBS for short. Magnetic storage is cheaper when compared to Solid State Drives or SSD for short. I am going to leave 8GB and SSD and move on to the next page. I am not going to tag the instances. You can choose to tag the instances to look up the instances easily. Let’s click on next.

Next we will configure the security group. Here we can define what kind of protocol, IP ranges and port ranges that we would like to allow to access your instances on AWS. Production hosts will have very limited access and you can also specify IP ranges and port ranges to define which IPs ranges can access your instances on which protocol and on which port. This is very powerful stuff. Since these instances are created for demo purposes, I am going to make the instances visible to anyone but still you would need access or keys to connect to the node.

Launch & Connect
Now we are ready to launch. Now you need keys to connect to the cluster. Select the key pair you would like to use to login to the cluster. If you don’t have one or you are doing for the first time, just select create new pair to create one. If you are creating a new key pair, a .pem file will be downloaded. Keep that file in a safe place as you would need it and don’t share it with anyone. I already have a key pair I am going to select that.


Now we are ready to launch. Click launch. It takes a couple of minutes for the instances to get fully started up.

Here they are. We now have 3 new instances running. Let’s give names to them. Let’s call them – Master, Slave 1 and Slave 2. Now we need to get the address of these instances to connect to them. These instances are publicly accessible from the internet by using the Public DNS and internal to the AWS network they can be accessed using the private DNS. We will using Public DNS to connect to the instances from our laptop and private DNS in our configuration files. So let’s take a note of both.

We will use Putty to connect to the newly created instances. Remember we selected or created a key pair that we will use when we launched the instance? We need the .pem file to login to the cluster. If you are using Putty you would need to create a .ppk file from the .pem file. To do that you need a small utility program called Puttygen. You can download puttygen from here. Open the tool. Click on Import and import the .pem file. Now once imported select save the private key. Now we have the private key.

Open putty, give the Public DNS. Give a name (I am naming as Master) so that we can easily look up the instance later. Go to ssh > auth and then select the private key. Hit save and connect. There you go we are now connected.

Accessing the instance from Mac or Linux is very simple. Use the below ssh command and you will be all set.
ssh -i /path/my-key-pair.pem ubuntu@public-dns-of-instance
Configure Putty for Slave 1 and Slave 2 as well. Now we can connect to Master, Slave 1 and Slave 2. The key that we selected during instance startup will automatically assigned to the user login named ubuntu. So for the login name use ubuntu.
That is it we are done and we are able to launch 3 instances in AWS and we are able to connect to them. Now visit Installing and Configuring a Hadoop Cluster with Apache Ambari to set up a Hadoop cluster blog post to instance Hadoop on your newly created instances in AWS.
If you still reading, you are probably very facinated with big data technologies like we are. Take you Hadoop understanding to the next level with our Hadoop Developer In Real World course or Hadoop Adminsitrator In Real World course or both. Give us a shout by writing us an email to info@hadoopinrealworld.com